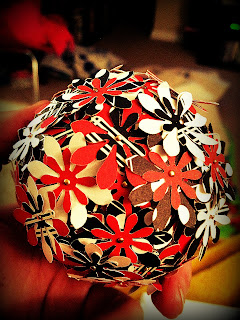
 I knew I wanted to do something with flowers, since that is traditionally what you get an artist after their performance. But my friend is not traditional, so I wanted to find something fun.
I saw THIS post on pinterest and decided it looked pretty easy. I bought four sheets of scrapbook paper that I liked (if you look closely, two have music note design) and two different flower hole-punches (with a coupon!) that I know I need for an upcoming project anyway. I genuinely thing the hardest part of this whole project was punching out all the flowers. I took Styrofoam balls and the pins I had left over from my state outline project and started pinning flowers. I used a small flower and a little flower together on most of the pins, but in hindsight using just the big flower on the 'under' layer would work just as well. There is a good bit of overlap needed to make sure that you cant see any of the ball.
 When I finished three balls I realized that they needed..something. So. I put it on a stick.
 the stick is actually a stem from a peacock feather, but I'm sure there are many different kinds of sticks that you could use for this. I know the little dowel rods they sell at the craft store would work just as well. I didn't glue the stick to the ball, but I'm sure that would have been a good idea.
I realized then that I really needed a vase of some sort for my strange flowers. I could have gone to the dollar store and found one, sure. But I'm lazy. I what sort of crafter would I be if I didn't fashion something myself?
I looked at a bottle of wine I had in the fridge. That would have looked nice, but my stems weren't long enough. I tried a mason jar, which had better height, but the wide mouth made the whole thing look sloppy. Then it hit me. Beer! A beer bottle was the perfect height and the mouth was a good vase-like opening (meaning the stems would stand up well). So I drank the beer (crafting rule number one, do not let anything go to waste!!) and got back on Pinterest to see what recommendations I could find for removing the label and painting the bottle. HERE is one that combines both.
Here is the bottle with part of the label removed and the paint I poured in.
 I had to use black paint (which I planned to anyway) because the bottle was green glass. Think about things like this first, if you're wanting to paint a lighter color. aluminum foil and a hair tie closed off the top so I could swirl the paint around. And by swirl I mean I let my dog chase it around the kitchen floor until everything was coated well.
The label removing part was a pain in the ass. It really does take awhile for it to soak long enough to get all the glue part off. Recommendation: hot hot hot water and lots of soap.
 I used scissors to scrape the label, which I know is stupid and incredibly unsafe. Something like a blockbuster card or a really good kitchen sponge would probably have worked better. But after everything was cleaned up, I dumped the excess paint in soap water and let the bottle dry out. I added a bow from some ribbon I had left over from Christmas (note: to make nice bows, use the ribbon with wire in it. It holds the loops out so prettily), tucked in the flower balls, and done.
Difficulty Rating: Easy-to-medium. Each step itself is pretty easy, but it definitely takes time to get the whole project put together. I think some parts (hole punching, paint rolling, etc) could be kid-friendly and entertaining.
Project Cost: less than ten dollars. The hole punches themselves cost approx $12, but I'll use them again for other projects. Each other item (paint, paper, stem, bottle) could be found for less than two dollars a piece at craft stores and/or dollar stores.
Verdict: Woot! I think the project, while entirely slapped together, came out pretty awesome. I plan on making more of these (probably with wine bottles/taller vases) for an upcoming event in sunnier summertime colors as centerpieces.